Tuesday, July 29, 2014

Stretch Denim Megan Dress

When Tilly, of and the Buttons fame, first released her book, Love at First Stitch, I was super pumped about the patterns, particularly the Megan dress. But I was also sad because I couldn't figure out how I was going to get my hands on it here in Thailand.  It's not even released in the U.S. yet!  Then it   occurred to be that I'd had lots of good luck finding English-language sewing and crafting books at the Japanese bookstore Kinokuniya.  Sure enough, there was exactly one copy of the book at Kinokuniya in Bangkok, so I rushed to get my hands on it. Woop woop! Sorry, not sorry, other BKK sewists!!* I probably overpaid for it, but it's mine, all mine!


The fabric: Tim brought back a bunch of fabric he bought on a recent business trip to Ho Chi Minh City (Saigon), Vietnam. When he told me that his hotel was near Ben Thanh market,  a lightbulb went off in my head: I remembered that Jenny of Cashmerette has written a post about fabric shopping in HCMC and had spotted some cool stuff at that particular market.  I casually mentioned it to Tim and shared the blog post with him, not thinking anything would come of it.  Much to my surprise and he returned with oodles of fun fabrics: floral printed stretch denim in two weights, dip-dyed gingham, super lightweight and breezy madras plaid... Dude definitely got the husband of the week award!  And thanks to Jenny for pointing him in the right direction!  I used the lighter weight floral stretch denim for my Megan dress.


Anywho, back to the Megan dress: so cute! I really love the dart/tucks on the bodice, and I dig how they meet up the the darts on the skirt... nice lines!  Sleek, but not tight in any way.


Here's a close-up of how the the darts of the skirt and the dart tucks on the bodice meet up at the empire waist... good stuff:


I muslined it using an old sheet to make sure the bodice worked and because I was worried about the skirt being tight in the hips.  But the skirt pattern has a great curve to it, so hippy ladies rejoice!  The bodice was great for me, no changes made. The sleeves are a wee bit poofy for my taste** and I was nervous that the gathered sleeve heads would be too bulky in the denim.  


Here are the changes I made:

- Because I was using stretchy fabric, I determined that I didn't need a zipper and I omitted it, cutting the back skirt and bodice piece on the fold, minus seam allowances, of course, to eliminate the back seam (yay! two cheers for stretchy fabric)
- I added 1.5 inches to the skirt length
- I ultimately left the sleeves off and used bias tape facings instead
- I used bias tape on the neckline and skirt hem, too.
- I topstitched the waist seam to tack the seam allowance up towards the bodice because it kept rolling down

I was worried that the light-colored printed denim would give the dress an unfortunately trashy '80s or early '90s look (google "floral denim dress"... whoa, not for me!), but I think the final result is quite cute!  It helps that the denim is more grey than blue. Paired with a cardigan or blazer it's good to work for the office.*** Plus, it goes with my wedding jewels (which I made, see here).  They haven't seen much action since I got married, which I was feeling bad about, so, winning!


* PS: are there any other BKK sewists out there? I know Adrianna of Crafterhours and Hey June was living here until recently, but anybody else out there?

** PPS: Anyone have any good recommendations for a tutorial on how to remove gathers from a sleeve... i.e. how to change a sleeve pattern to have a smooth head?

*** I wore my stretch denim Megan to work on Monday and got 3 compliments within 15 minutes of arriving!  And it was super comfortable all day, so, double win.


Sunday, July 27, 2014

Myrtle Mania

I've been quite happy with Colette's recent patterns for knits, Mabel and Moneta, so I downloaded the latest, Myrtle, right away. And then our printer ran out of ink and we couldn't find replacement cartridges. Wah waaaah.  But there is a happy ending!


Fast forward a couple weeks and I finally got the pattern printed up, taped together and ready to roll! I decided to go the woven route after receiving an order from Fabric.com chock full of rayon challis (my new favorite fabric after making and wearing my lovely, flowy Summer Jazz dress).  They had a sale and I may have gone a little crazy... for my first Myrtle I went with this navy fabric printed with various blue and green roses (seems to be sold out). I'm not sure roses are my bag, but the colors totally are... plus they're kinda in keeping with Colette's whole vintagey-modern style, no?


I was gonna make Myrtle with a speckled rayon challis I had also ordered, but when poking around on the internet scoping out the other Myrtles, I saw that Leslie at Stitchin' in my Kitchen has already done exactly that and it looked awesome.  That might be my next Myrtle... imitation/flattery, etc.


Details:
- I went with View 1, the longer length with no shoulder tabs
- Size L graded to XL at the hips, just in case (although that was probably unnecessary)
- Cut the back skirt on the fold to eliminate the seam (not sure why that wasn't on the fold in the first place...to save fabric?)
- My back-of-the-neck bias tape didn't end up quite reaching into the shoulder seams... next time I'll make it extend past the edges and then trim afterwards
- After sewing the front and back together, I  ended up with some weirdness at the armpits: tiny points sticking out of the side seams. It's mostly unnoticeable with the printed fabric and because of the location, but I'm sure I screwed something up...
- I fed the elastic through after sewing the waist seam up so I didn't have to stretch as I went

Verdict:
I love it!!  The fit is great for me. The cowl hangs beautifully. I love how comfy the elastic waist is, but don't think it looks to elastic-y, if ya know what I mean. The skirt is a great length and width. Awesome, cute, comfortable.  I think it will look equally good with flip flops on the weekend as it will with heels and a cardigan or blazer.  I will definitely make another one before too long... I dig the shirt version over at Nicole at Home, too!

Have you made Myrtle yet?  Planning on it?


Monday, July 21, 2014

Sally + Batik Minnie


I think I may have jinxed myself with this project. I made a comment upon cutting it out that I really disliked the fabric, but that I knew Zoe would love it... after that, nothing but trouble with this dress, some of my own making, some just bad luck. Oops!

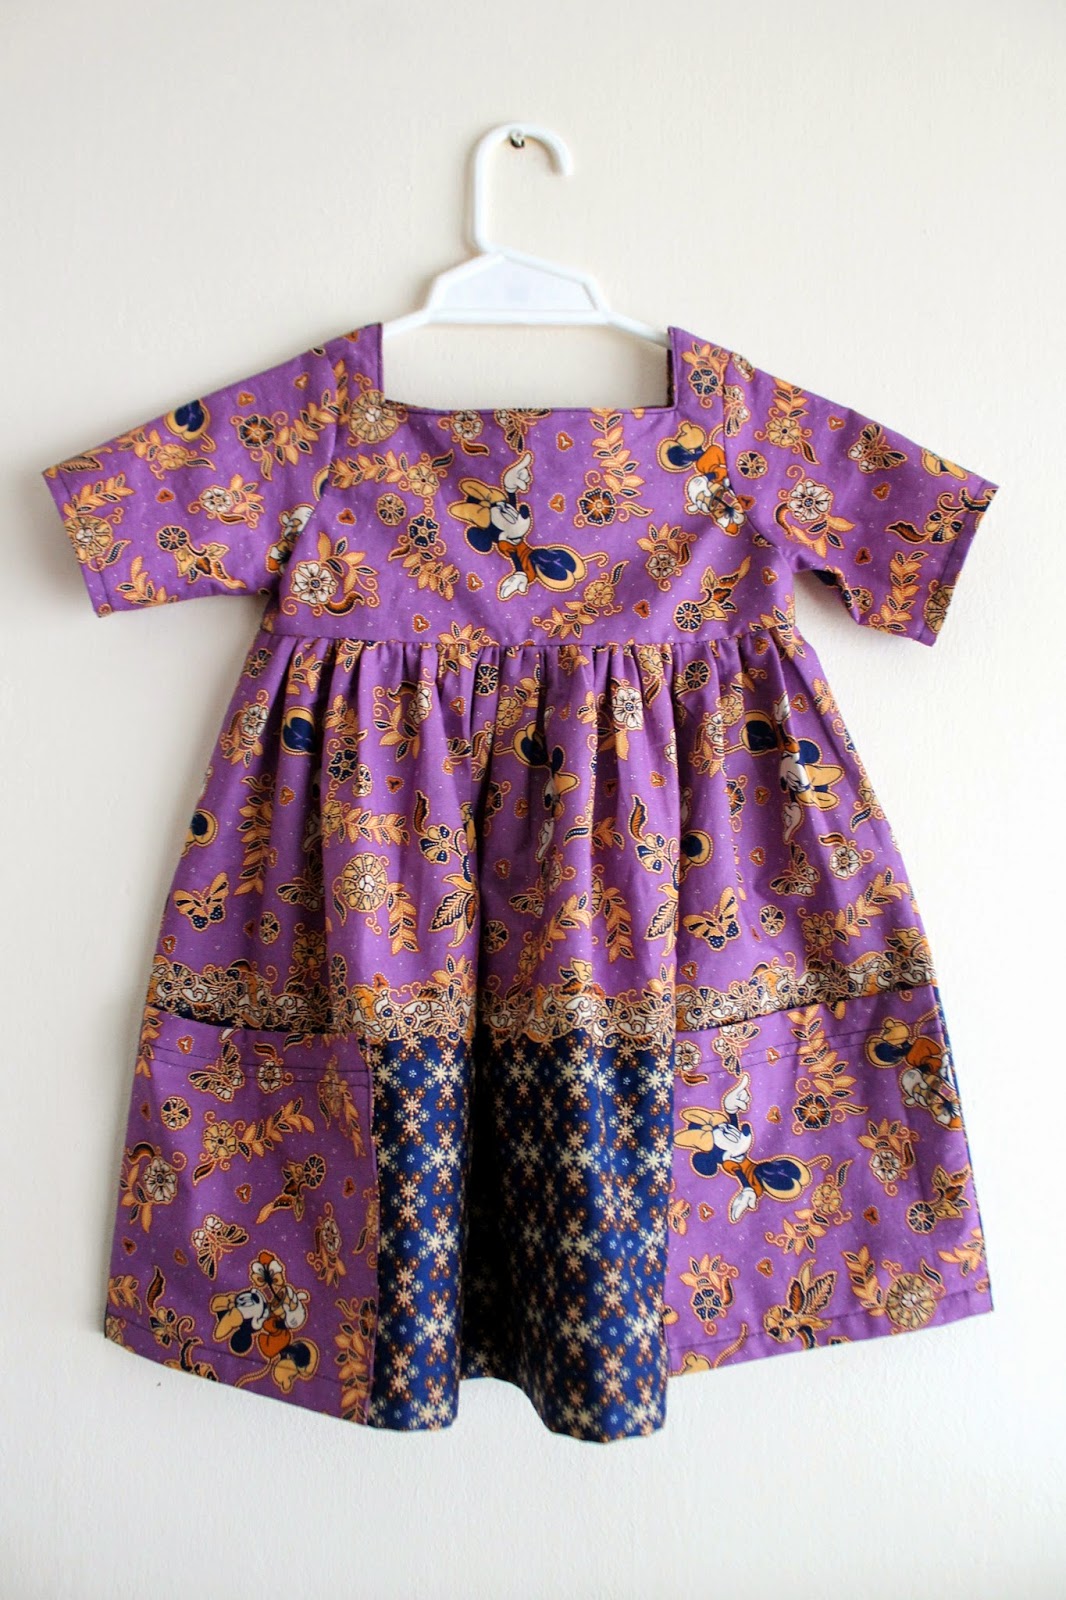
This is the Sally Dress from Very Shannon. I've had this pattern for a while now; I bought it back as part of the Sew Fab pattern bundle back almost a year ago... I love the giant pockets (and imagine Zoe will, too), the cute sleeve length, and the interesting triangle-shaped shoulders, which I understand help the bodice stay on even though the square neck is wide.


 The fabric is some cotton/poly Disney "batik" from Batik Keris (you might remember I made the girls some Mickey Mouse batik outfits last year.)  I bought it back before I moved to Thailand from Indonesia, knowing Zoe was a fiend for Minnie Mouse. Hopefully she still is!  I really don't love the fabric... it's just machine-printed fabric, not true wax-resist batik, and I don't love the yellowy/tannish/gold accent color. But it was the only one with Minnie.


I tried to place Minnie carefully on the bodice, sleeves and pockets (although it appears Minnie ended up on the back of both sleeves... oh well). I also made sure the border print formed the hem. Unfortunately, since the skirt is so full, the Minnies on the purple strip on the skirt get a bit lost in the gathers.  


This was just one of those dresses that had to be unpicked and resewn approximately a million times. No fault of the pattern at all, but definitely a result of sewing while a little tired, blatantly not following directions and other shenanigans. In the end it came out fine, but it's definitely not my best work. Don't look too close at the top-stitching! 

Can't wait to see it on Miss Z!  Hopefully she receives it in time for her birthday (3???!!!!!) and likes it!

Saturday, July 19, 2014

Ash Halter Top and Monkey Bar Skirt

My first Monkey Bar Skirt for Zoe came out so cute, I immediately made another one.  This time, though, I used woven fabric for the skirt... a super cute cotton/poly blend with watercolor strawberries from a local shop here in Bangkok.  The green waistband and shorts are made from this emerald heather jersey blend from Girl Charlee (super soft!).  Love it!  Download this free pattern from Hey June if you haven't already!


I also made a top to match: the adorable halter top portion of Willow & Co's Ash jumpsuit.  Zoe looked so cute in the pink seersucker Ash jumpsuit I made here that I thought I should make it again.  The halter doesn't have a lot of hanger appeal (or kitchen table appeal, as it were), but I know it will look awesome on her:


The whole outfit is pretty damn cute, huh?:

Thursday, July 17, 2014

Dude Sewing: Juba Shorts for Men


Shorts!  For dudes!


When Rachael at Imagine Gnats released the Juba shorts pattern and it included an option for men's shorts, I decided it was a sign. Must make shorts for Tim. Must continue quest to make men's clothes. Eventually I must master the zip fly.  But for now, baby steps. Casual, tie/elastic waist shorts to start.


I decided to use this fun pre-patchworked fabric I got on clearance at a local store here in Bangkok. Mayhaps not the best choice as it's quite lightweight.  But I forged ahead nonetheless, topstitching the seam allowances down for extra strength.


Sadly, my patchwork shorts for Tim may have to be limited to lounging around the house.  The crotch is super low (although when I look at the photos, it looks normal?). That, combined with the thinness of the fabric, makes me worry that he'll split them up the center seam if he wears them out and about.


I think I might have made a size too big... they're a bit roomy all around.  Or perhaps it's a simple fitting alteration: shortening the length from waist to crotch and then lengthening the legs.  I'm not sure, but I will definitely try making these Juba shorts again, as they have a lot of potential to be a weekend wardrobe staple. Tim's been eyeing the stretch chambray I just got from the Imagine Gnats shop, but he'll have to fight me for it! Juba shorts for me, too?

Until then, please enjoy these photo session outtakes below!!

Google+ decided these photos of Tim making weird faces and strangely grabbing his stomach were GIF-able:


And that this one was "auto-awesome"-worthy... I guess it is automatically awesome when you grow a third arm directly out of your existing forearm... imagine how much sewing I could get done with a third arm!!:


Monday, July 14, 2014

Monkey Bar Skirt!

A productive sewing weekend!  Less productive on other things... oops!

 Using the leftovers from my rainbow dot Moneta, I whipped up the brand new (free!) Monkey Bar Skirt pattern from Hey June (remember I made Hey June's Greenpoint cardigan late last year?) as my first weekend project.  


Such a cute pattern and great idea... at first it looks like a simple skirt, but then, booyah!!!
Little built-in bike shorts underneath:


This sounded perfect for Zoe, who is spending the summer playing on her new (to her) swingset. Does the Monkey Bar Skirt count as a skort? I'm gonna vote no, because that word has bad '90s connotations for me.  Anyway, can't wait to see it on Zoe!  It's just not quite as cute when photographed flat as I'm sure it will be on her...

In any case, the skirt is crazy easy to put together. It took me several hours, but only because my serger ate the first skirt (tears!)... turns out if you don't change the needles on your serger, bad things happen.  Namely, knit fabrics start getting sucked/pushed into the loopers, ripping a hole in your project and making a giant tangled mess in the machine. Consider this a public service announcement... change your needles! Now you know, and knowing is half the battle.  Luckily the shorts and waistband part from the first skirt were undamaged, and I was able to fit another skirt out of my scraps by cutting it the non-stretchy way, which Adrianna reassuringly said in the instructions was fine.  Woo!

Monday, July 7, 2014

Makes in the Wild

Got some photos of my makes in their natural habitat to share... I always like seeing the stuff I make out and about in real life, especially the stuff I send off to my nieces across the world!

Here they are looking pretty freaking cute for an outing to Costco with their GrandMartha. They're wearing their elephant MC Hammer pants and their matching Lola tanks.  As Martha said "We wore our elephant outfits today. It was a perfect day. We went to Costco and entertained all the elderly people there."


Here is Anna playing in her Tumble Tee made from vintage knit from Martha's stash...  the second photo is one of the funniest things I have seen in a long time.  I keep looking back at it when I need a laugh...

"OMG! I made it to the top!"

"Sngrfhisfhhcppllllffff."

And Miss Z in her seersucker Ash jumpsuit... adorable:


Some funny photos of me and Tim wearing me-mades (me in my new and awesomely comfortable Summer Jazz Dress, Tim in his grey Strathcona tee) while on a weekend jaunt to Koh Chang ... our hotel had this fun tree swing out over the water and literally every person who walked past it on the beach was like "Tree swing! Let's instagram it!"  We laughed and laughed, and then decided, well, when in Rome!:


And, finally, for your amusement, outtakes from my Jorna tank photo session. Google+ made a sweet GIF of me picking lint off my boob.  Noooice.:


Saturday, July 5, 2014

DIY Travel Souvenir: Coin Magnets

It's been a long time since I've posted any projects other than the sewing variety on the blog, but I was inspired by this tutorial from Tattered Style I found via Pinterest to make souvenir magnets out of coins from abroad. It is a great idea... and so insanely easy, too. The steps are thus: 1) get coins. 2) get magnets. 3) get glue. 4) glue magnets to coins.


Tim and I have a wealth of foreign coins (ok, "wealth" is an exaggeration... it probably totals under $10) from all of our travels over the years, particularly the past few years. The coins are pretty cool in some cases and have been languishing in our drawer.  When I saw the tutorial I knew it was a must-make - great idea!  Also because I already had some adhesive magnets from the Japanese dollar store in my possession, negating the need for about a third of the steps in the tutorial.  Win!


Here are my magnets, which took approximately 3 minutes to put together:


Countries represented: 

Thailand, U.A.E. (that must have been an airport acquisition, because neither Tim nor I have actually been there), Vietnam, the Philippines, Hong Kong, Australia, New Zealand, Sri Lanka, Malaysia, Indonesia...  

I'm pretty sure we have some coins from other countries kicking around here somewhere, so I will definitely be making more magnets when I find them.  

Here's this round in action, doing their new, very important job, holding up memories and grocery lists: